Photographing the real Las Vegas isn’t about finding secret spots, but about understanding the city’s deliberate architectural and psychological design.
- Casino interiors are intentionally disorienting « ergonomic labyrinths » designed to hold your attention and your wallet.
- The city’s visual identity is a constant duel between nostalgic Googie futurism and the imposing, reflective surfaces of modern glass towers.
Recommendation: Use this guide to deconstruct the city’s visual grammar, turning your camera into a tool for analysis to capture narratives, not just buildings.
For most, photographing Las Vegas means a predictable checklist: the welcome sign, a burst from the Bellagio fountains, the neon glow of a slot machine. These are the postcard shots, the visual shorthand for a city built on spectacle. But for the urban explorer, the amateur photographer with a keen eye, this surface-level representation feels hollow. It captures the glitter but misses the ghost in the machine, the calculated design that underpins every sightline and every shadow.
The common advice— »use a tripod at night, » « look for reflections after it rains »—scratches the surface. It treats the city as a static subject. The real key to unlocking unique, powerful images of Las Vegas lies not in better gear or secret locations, but in a deeper understanding. What if the true art of Vegas photography was less about what you see, and more about understanding *why* you are seeing it that way? This guide proposes a new approach: to see the city as a psychological landscape. We will decode the architectural grammar, from intentional disorientation to the battle between past and future aesthetics, to transform your photography from simple documentation into critical, artistic commentary.
This journey will take us through the deliberate chaos of the Strip, into the technical challenge of capturing neon light, across the aesthetic battlegrounds of the city’s architecture, and into the practical realities of shooting on private property. We will map out not just where to go, but how to think in each location to produce images that resonate with meaning beyond the cliché.
Summary: A Photographer’s Guide to Decoding and Capturing Las Vegas’s True Architectural Identity
- Why the Strip’s Architecture is Designed to Disorient Pedestrians?
- How to Shoot Sharp Neon Photos with a Smartphone in Low Light?
- Googie Architecture vs. Modern Glass: Which Defines the Real Vegas?
- The Trespassing Risk When Shooting in « Public » Casino Forecourts
- When to Catch the « Blue Hour » for the Perfect Bellagio Fountains Shot?
- In What Order Should You Visit the Iconic Signs to Save Uber Fares?
- Day Tour or Night Tour: Which Reveals the True Soul of the Signs?
- Neon Lights Tour: How to Find the Best Vintage Signage Photo Spots?
Why the Strip’s Architecture Is Designed to Disorient Pedestrians?
The feeling is familiar to any first-time visitor to the Las Vegas Strip: a sense of being lost, of time dilating, of exits being tantalizingly present yet impossibly distant. This is not an accident; it is the core principle of a meticulously crafted psychological landscape. Photographing this phenomenon requires understanding that the building is not your subject. The subject is the orchestrated confusion the building creates. Your goal is to capture the feeling of being in a maze, not just the walls of the maze itself.
Architectural theorists and casino designers have perfected this art over decades. As Professor Norman Klein noted in a PBS documentary, casino environments are deliberately structured to be immersive and hard to navigate. This design philosophy creates a sense of « happy imprisonment, » a space where visitors have infinite choices but no clear path out. As he states:
Casino spaces are scripted particularly as ergonomic labyrinths. Entrances and exits remain askew. The atmosphere is immersive.
– Professor Norman Klein, PBS American Experience – A Space to Play
Use wide-angle lenses inside to exaggerate the sprawling, repetitive patterns of slot machines. Focus on the lack of natural light and clocks, visual cues of a timeless, sealed environment. Capture shots of people looking confused at signage, or long, seemingly endless corridors that curve into nowhere. These images tell a far more interesting story than a straight shot of a casino’s facade.
Bill Friedman’s Principles for ‘Happy Imprisonment’
Casino design expert Bill Friedman’s thirteen principles are the unwritten rules of this architectural grammar. Concepts like ‘A physically segmented casino beats an open barn’ and ‘Low ceilings beat high ceilings’ aim to create intimate, irresistible gambling zones. His most telling rule, ‘Pathways emphasizing the gambling-equipment beat the yellow brick road,’ is a direct order to avoid creating clear, efficient paths that might lead a customer past the revenue-generating areas. The result is a consumer mousetrap, a masterpiece of intentional disorientation designed for maximum dwell time, and a fascinating subject for photographers who know what to look for.
How to Shoot Sharp Neon Photos with a Smartphone in Low Light?
Capturing the vibrant, electric glow of Las Vegas neon is a rite of passage, but it often results in blurry, washed-out images, especially on a smartphone. The key is to move beyond « auto » mode and take manual control. The goal isn’t just to make a dark scene bright; it’s to balance the intense light of the neon tubes with the ambient darkness, preserving color saturation and sharp lines without introducing excessive noise or blur.
First, stabilize your phone. Any movement, however slight, will create blur in low light. Brace your phone against a wall, a railing, or a lamppost. A small, pocket-sized tripod is even better. Next, dive into your phone’s « Pro » or « Manual » camera mode. Your two most important settings are ISO and shutter speed. ISO controls the sensor’s sensitivity to light. A high ISO brightens the image but adds grainy « noise. » Shutter speed dictates how long the sensor is exposed to light. A slow shutter speed lets in more light but creates motion blur if anything moves.
Start by lowering your ISO. While phones can go much higher, photography guides recommend starting with an ISO between 800-1600 for a clean image. With a low ISO set, your phone will automatically choose a slower shutter speed. This is where stabilization is critical. To avoid overexposing the neon itself, tap your screen on the brightest part of the sign to set the exposure point. This tells the camera to protect the highlights, preventing the vibrant colors from blowing out to pure white. Experiment with these settings to find the sweet spot where the neon is sharp and colorful, and the background remains dark and moody.
Googie Architecture vs. Modern Glass: Which Defines the Real Vegas?
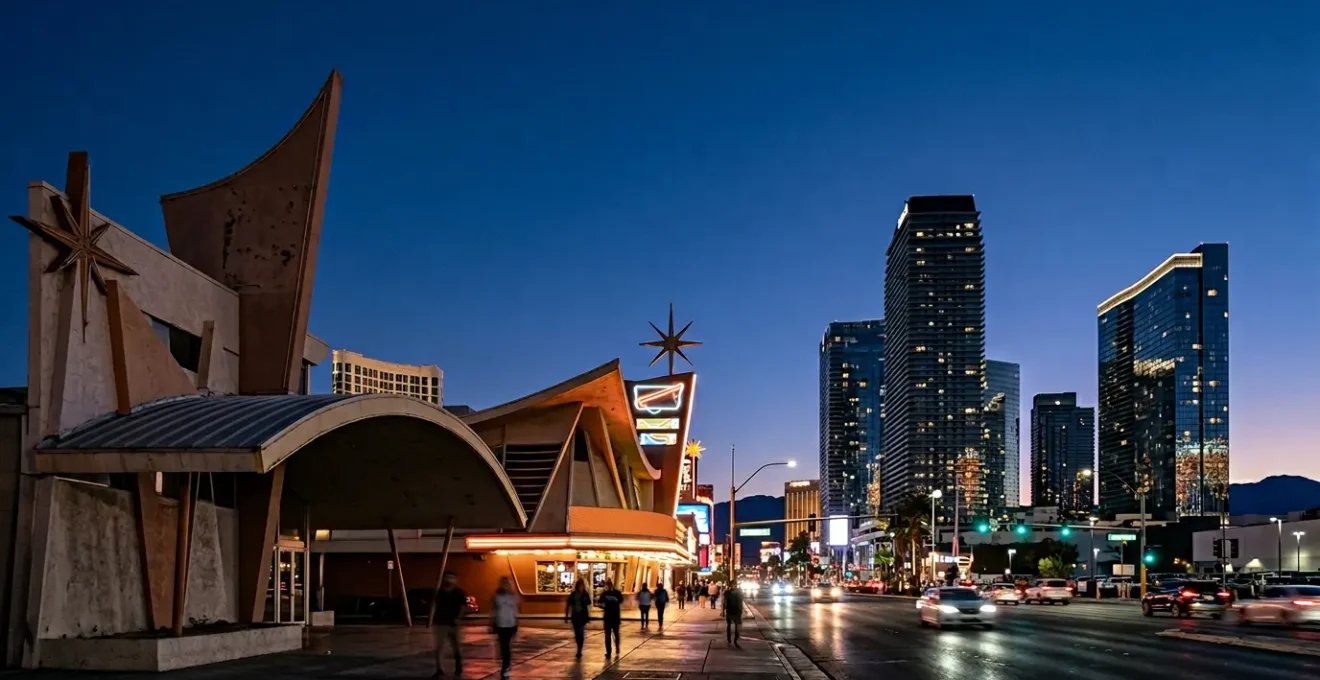
Las Vegas’s skyline is a battleground of architectural philosophies. On one side, you have the remnants of Googie architecture, a mid-century futurism of sweeping curves, starbursts, and atomic-age optimism. On the other, the monolithic towers of glass and steel that define the modern corporate Strip. Photographing the « real » Vegas means understanding and capturing this visual dialogue between the city’s past dreams and its present reality. This is a core element of its architectural grammar.
Googie was the architecture of the American space race, a style that was playful, bold, and designed to be seen from a moving car. As Cynthia Ammerman of the Nevada Preservation Foundation explains, it was about creating an iconic face for everyday buildings. In a quote to the Las Vegas Review-Journal, she notes, « Googie architecture put a face to the space exploration that Americans were fascinated with between the 1940s and 1970s. The work was most often seen in the building of cafes, restaurants, car washes, motels and signs. » To photograph Googie, focus on these dynamic, sculptural forms. Use low angles to emphasize their upward-sweeping lines against the sky.

In stark contrast, the modern glass towers are defined by their anonymity and reflective power. Their surfaces are not about expressing a unique form, but about mirroring the spectacle around them. Your photographic approach here should be about capturing these layered realities. Shoot them during the « golden hour » when their glass facades absorb the warm light, or find angles where they reflect the chaotic energy of the Strip or the sculptural forms of older, neighboring buildings. The most compelling images often place these two styles in the same frame, forcing a comparison between the tactile optimism of Googie and the cool, reflective detachment of modernism.
The Trespassing Risk When Shooting in « Public » Casino Forecourts
One of the great paradoxes for an urban photographer in Las Vegas is the line between public and private space. The vast, welcoming plazas, the replica canals, and the spectacular fountain displays all feel like public parks, but they are not. They are privately owned properties, and this distinction is crucial. While security is generally tolerant of tourists taking selfies, a photographer with a more professional-looking camera or a tripod can quickly draw unwanted attention. The most common question is, « Is it legal to take photos here? » The answer is nuanced: yes, until they ask you to stop.
Casinos are private property and can set their own rules. Generally, photography is permitted in public areas as long as you are not disrupting business, shooting a gaming table, or appearing to be working on a commercial project. The moment a security guard approaches you, the goal is de-escalation, not confrontation. You are on their turf. Arguing about your rights is a losing battle; the most they can do is ask you to leave, and you should comply politely. Your photographs are your property; security has no legal right to view them or force you to delete them. The key is to get your shot and move on, blending in as much as possible.
This « gray man » approach is essential for capturing authentic images without incident. It involves being aware, efficient, and above all, respectful. For photographers looking to document the architectural details and human flow within these quasi-public spaces, mastering this soft skill is as important as mastering their camera settings.
Your Action Plan: The ‘Gray Man’ Technique for Casino Photography
- Use smaller cameras or smartphones instead of professional DSLRs to avoid attracting security attention.
- Avoid tripods entirely — they are the number one trigger for security intervention as they signal commercial intent.
- If approached by security, remain polite and explain photos are for personal use, not commercial purposes.
- Never offer to delete photos already taken; security has no legal right to review or demand deletion of your images.
- Do not let interactions become confrontational; remember you’re on private property and can be asked to leave.
When to Catch the « Blue Hour » for the Perfect Bellagio Fountains Shot?
Photographing the Bellagio Fountains is a cliché, but transcending the cliché is a worthy technical and artistic challenge. The secret is not the what, but the when and the how. The ultimate time to shoot is not in complete darkness, but during the « blue hour, » the magical twilight period after sunset when the sky glows with a deep, sapphire blue, perfectly balancing the artificial lights of the Strip.
The blue hour has two distinct phases, each offering a different aesthetic for your fountain shots. You must be prepared, as this window of perfect light is fleeting.
- Civil Twilight: Occurring immediately after sunset, this is the brighter phase. It’s the ideal moment for balancing the deep blue of the sky with the still-visible architectural details of the Bellagio tower and surrounding buildings. The fountains’ lights will begin to pop without being overwhelmed by total darkness.
- Nautical Twilight: This phase begins about 20-30 minutes after sunset. The sky is a much deeper, richer blue, making the city lights and the illuminated water jets appear far more dramatic and vibrant. This is the time for high-impact, energetic shots.
Position is just as important as timing. Instead of joining the crowds at street level, seek superior vantage points. The elevated pedestrian walkway near The Cosmopolitan offers a fantastic high-angle view, compressing the fountains, the Bellagio tower, and the Paris hotel’s balloon into a single, layered composition. For a different perspective, use a telephoto lens from across the street to isolate and compress elements. Technically, use a slow shutter speed (several seconds) on a tripod to transform the water jets into misty, ethereal shapes. Always check the wind direction to position yourself upwind and avoid getting lens-drenching spray. Time your long exposure to capture the peak burst of a water cannon for a stunning light-painting effect against the twilight sky.
In What Order Should You Visit the Iconic Signs to Save Uber Fares?
A photographic tour of Las Vegas’s iconic signage can quickly become an expensive and inefficient series of Uber rides if not planned strategically. To maximize your time and minimize your travel costs, you need a route that follows the geographical and logistical flow of the city, utilizing its unique transportation network. A hyper-optimized route allows you to focus on composition and light, not on your rideshare app.
The key is to think in segments: the South Strip, the Mid-Strip, and the Downtown/Fremont area. By tackling these zones in a logical order and using a mix of free trams, public buses, and walking, you can create a seamless and cost-effective photo expedition. This approach also allows you to plan for lighting conditions, hitting the east side of the Strip in the morning and the west side for the coveted sunset glow.
A proven, efficient route plan looks like this:
- Start South: Begin your day at the ‘Welcome to Fabulous Las Vegas’ Sign. Go in the morning when the sun is in the east, lighting up the front of the sign perfectly for photography.
- Use Free Trams: From the welcome sign, head to Mandalay Bay. Use the free tram system that connects Mandalay Bay, Luxor, and Excalibur to easily capture the architecture of the southern Strip without excessive walking or cost.
- Walk the Mid-Strip: The central part of the Strip is best explored on foot, using the network of pedestrian bridges and skywalks. This gives you elevated angles for shooting the connective tissue of the city’s architecture.
- Bus to Downtown: From the central Strip, take the RTC Deuce bus. This double-decker bus is a direct and cheap route to the Fremont Street area, which is the epicenter of vintage signage. Bonus tip: the top deck of the bus acts as a mobile elevated platform for unique Strip photos away from sidewalk crowds.
- Explore Downtown: Once downtown, consider renting a scooter or bike to efficiently hop between the more scattered vintage signs in the Fremont East and Arts District areas.
Key Takeaways
- True Las Vegas photography goes beyond iconic spots; it involves decoding the city’s psychological and architectural design.
- Mastering manual controls on your camera (especially for neon) and understanding the quality of light (blue hour, day vs. night) is more important than having expensive gear.
- The city’s visual narrative is a conflict between optimistic Googie futurism and impersonal modern glass; capturing this tension creates powerful images.
Day Tour or Night Tour: Which Reveals the True Soul of the Signs?
For a photographer, choosing between a day tour and a night tour of Las Vegas’s signs is not just a logistical choice—it’s a philosophical one. It’s a decision between capturing Form versus Energy. Each approach reveals a completely different aspect of the sign’s « soul, » and the master photographer knows how to leverage both. A day tour is an exercise in urban archaeology, while a night tour is an immersion in kinetic spectacle.
During the day, under the harsh desert sun, a sign’s true physical nature is exposed. You are not photographing a light source; you are photographing a sculpture. This is the time to capture the details of its construction and decay: the texture of peeling paint, the complex engineering of its steel support structure, the delicate patterns of broken glass tubes, and the subtle patina of rust. Daylight is particularly effective for Googie-era signs, whose power lies in their optimistic, sculptural forms that are often lost in the simple glow of night.
At night, the sign’s intended purpose is revealed. It ceases to be a static object and becomes a beacon of luminous energy. The physical structure dissolves into darkness, and all that remains is its message, painted in light. This is the time to capture the atmospheric mood, the vibrant colors bleeding into the dark sky, and the overwhelming sensory experience of the sign in its natural element. Night is superior for modern LED signs, whose very being is the digital display, and for capturing the overwhelming, immersive glow of areas like Fremont Street.
The following table, based on principles outlined by resources like guides on neon photography, breaks down this fundamental choice.
| Aspect | Day Photography (Form) | Night Photography (Energy) |
|---|---|---|
| What’s Revealed | Physical structure, rust, texture, engineering details, peeling paint, broken bulbs | Intended luminous purpose, kinetic energy, glowing colors, atmospheric mood |
| Optimal Time | Morning to mid-afternoon for direct sunlight revealing material decay | Late evening when neon lights are brightly lit and compete with darkness |
| Best for Googie-Era Signs | Captures sculptural, optimistic forms and starburst details in daylight | Less effective as these signs rely on form over light |
| Best for Modern LED Signs | Less impactful as structure is secondary to digital display | Captures overwhelming immersive digital glow and color intensity |
| Storytelling Approach | The archaeology of Vegas: decay, survival, urban evolution, historical context | The intended experience: excitement, entertainment, sensory immersion |
| Technical Challenges | Managing harsh desert sunlight and shadows | Preventing blown-out neon colors, managing high ISO noise |
| Superior Third Option | Transitional Light (Dawn/Dusk): Captures physical structure against colorful sky as neon begins to glow, balancing both form and energy in single frame | |
Neon Lights Tour: How to Find the Best Vintage Signage Photo Spots?
While the Strip dazzles with modern LED technology, the true heart of Las Vegas’s luminous history beats in its vintage neon signs. Finding these signs is a treasure hunt that takes you from the tourist-heavy Fremont Street Experience to the quieter corners of the Arts District. The ultimate destination for any student of neon, however, is a place where the signs have retired: The Neon Museum.
Approaching the Neon Museum’s « Boneyard » is not about finding the perfect selfie backdrop. It is about entering a photographic archive of design and typography. With over 200 historic signs, the Boneyard offers a unique opportunity for photographic deconstruction. Instead of shooting the whole sign, focus on specific assignments: document the evolution of typography from the curvy scripts of the 1950s to the bold block letters of the 1970s. Use a macro lens to capture the craftsmanship in the exposed glass tubes and twisted metal. Create abstract compositions from the chaotic, beautiful overlap of fragmented signs resting against each other. This is where you can truly appreciate the atomic-age influence that defined so much of Vegas design.
The museum itself is a piece of history. The visitor center is the former lobby of the La Concha Motel, a stunning 1961 example of Googie architecture designed by Paul R. Williams. Its soaring, shell-shaped concrete roof is a photographic subject in its own right. As The Neon Museum itself notes, « Las Vegas took Googie and ran with it. Think dramatic angles, flying saucer shapes, and designs like The Jetson’s home in the classic cartoon. » The Boneyard is where the ghosts of this aesthetic come to rest, offering a poignant, beautiful, and endlessly fascinating subject for the photographer willing to look beyond the lights and see the history.
To truly capture the soul of Las Vegas, you must move beyond being a tourist with a camera and become an interpreter of its built environment. By understanding the city’s design philosophy, you can create a portfolio that tells a deeper, more compelling story—a story of engineered desire, architectural ambition, and the beautiful decay of yesterday’s vision of the future.